
Add New Products
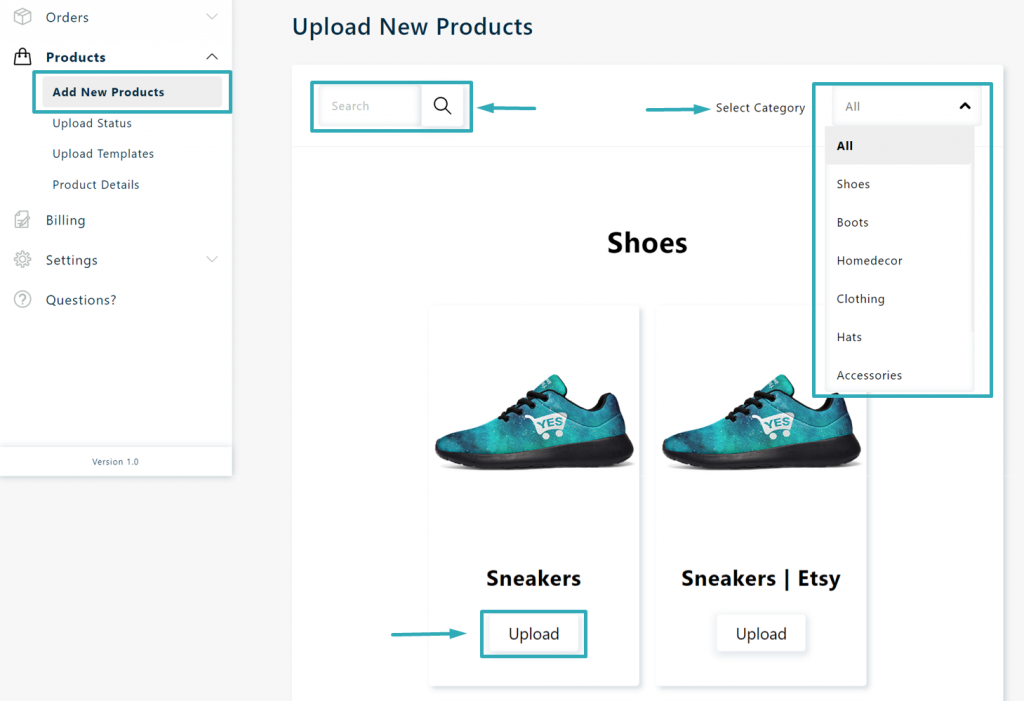
To upload a new product go to the Products section and select Add New Products. Scroll down to the product type you wish to upload and click on the Upload button.
You can reduce the number of products available on the page by searching a word in the search bar or by selecting a category in the dropdown menu at the right of the page.
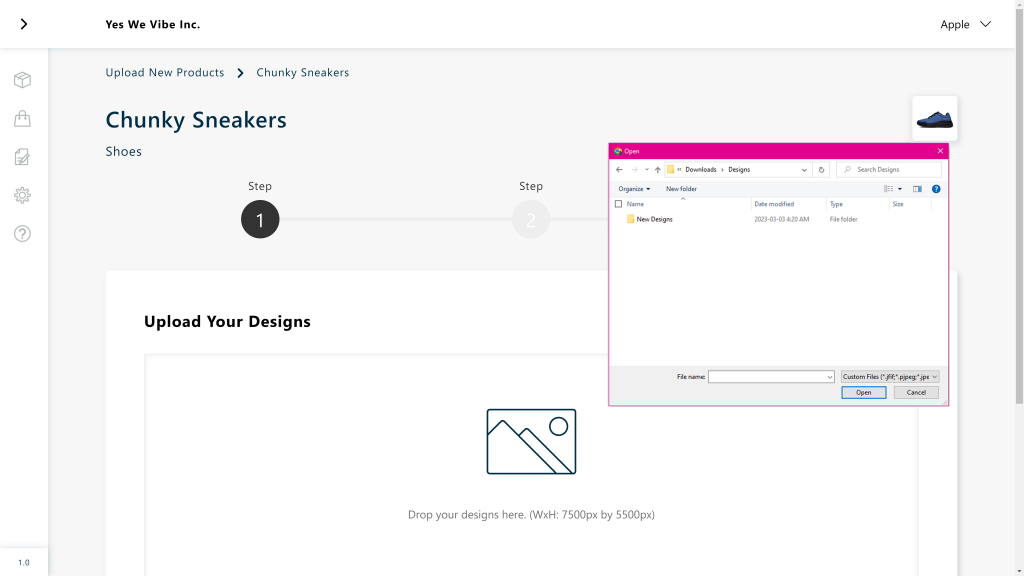
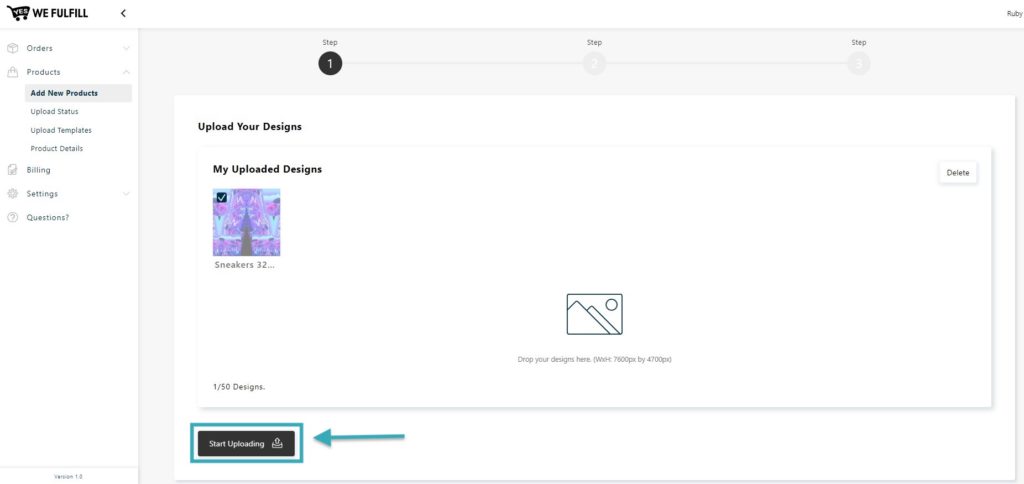
Upload Your Designs – Step 1
A few seconds after having clicked on the Upload button, you’ll be prompted to upload your designs in step 1 of the Upload Designs process.
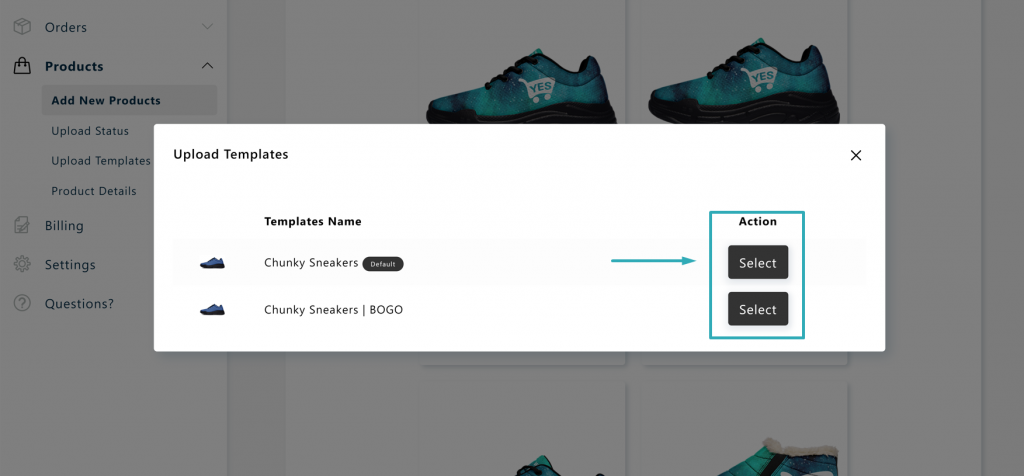
If you have previously created Templates for this product type, you’ll first need to choose between the default product template (created by the YWF app) or one from the list you have created. Then, you’ll be moving to step 1 of the Upload Designs process.
You can either Drag and Drop your designs directly from your computer or click anywhere in the “My Uploaded Designs” box and your computer’s file explorer will open for you to choose the desired designs.
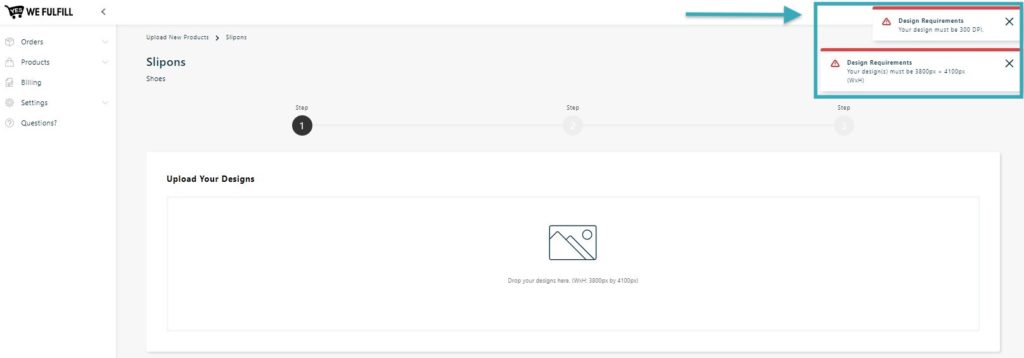
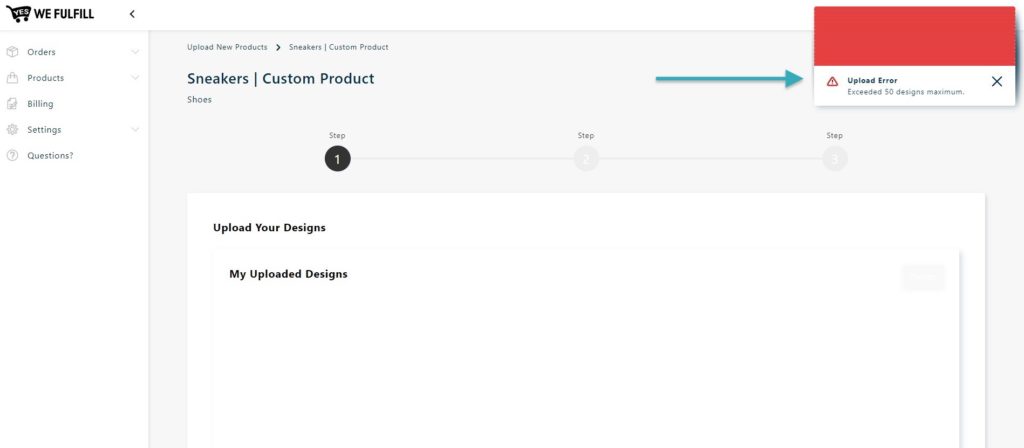
You can upload up to 50 designs at the same time. Please make sure the file dimensions meet our requirements which are available in the Product Details menu.
If you mistakenly uploaded a wrong file, move your pointer on the image and check the white box appearing on the left corner of the image. Then delete the image by clicking on the Delete button at the right.
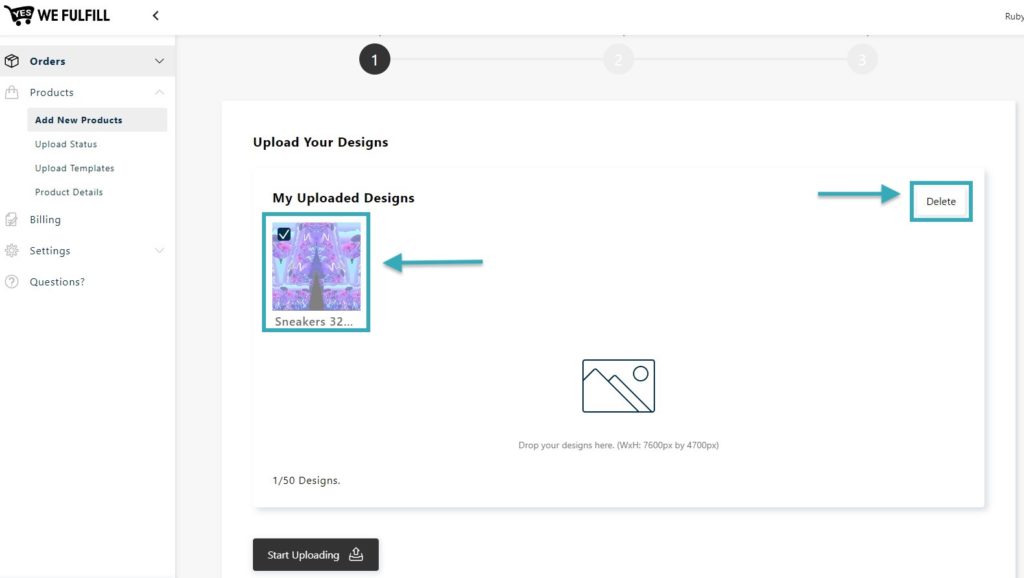
Once you’ve reviewed all your images, click on the Start Upload button.
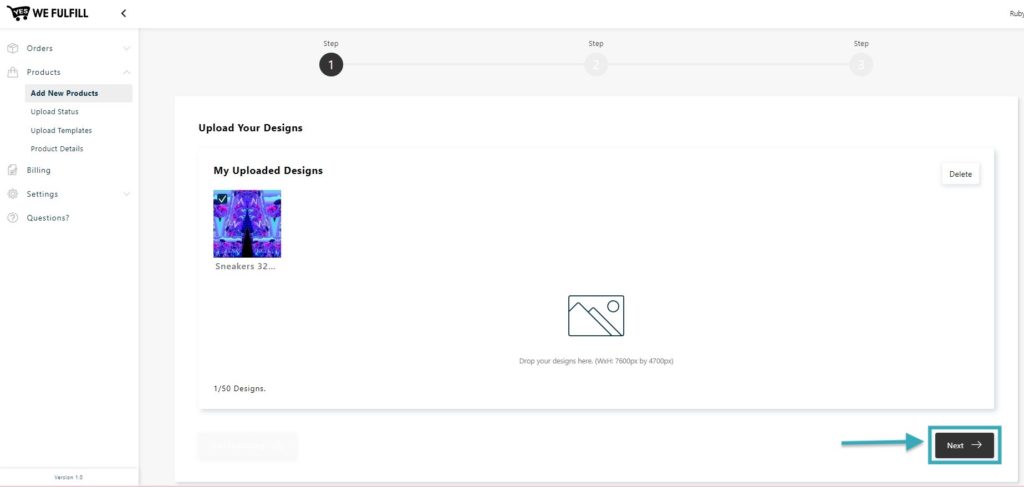
Once all your designs have been uploaded, click on the Next button to continue to step 2.
Upload Your Designs – Step 2
In this section, you will be able to update your Product Title as well as all the Product Details that will be available in your store.
Click on Bulk Edit Your Product Titles if you have uploaded multiple products and want to bulk replace specific text in your titles.
Find box: Add the word(s) or characters to change
Replace Box: Add the word(s) or characters that will replace the above
Then click on the replace button.
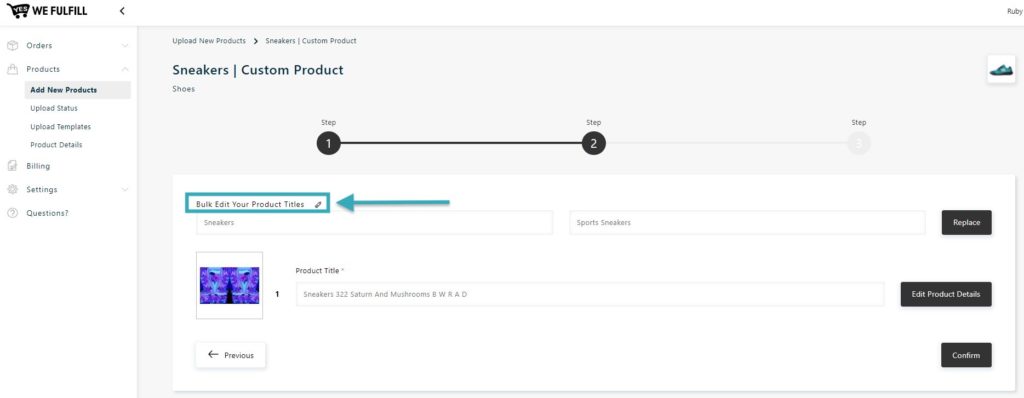
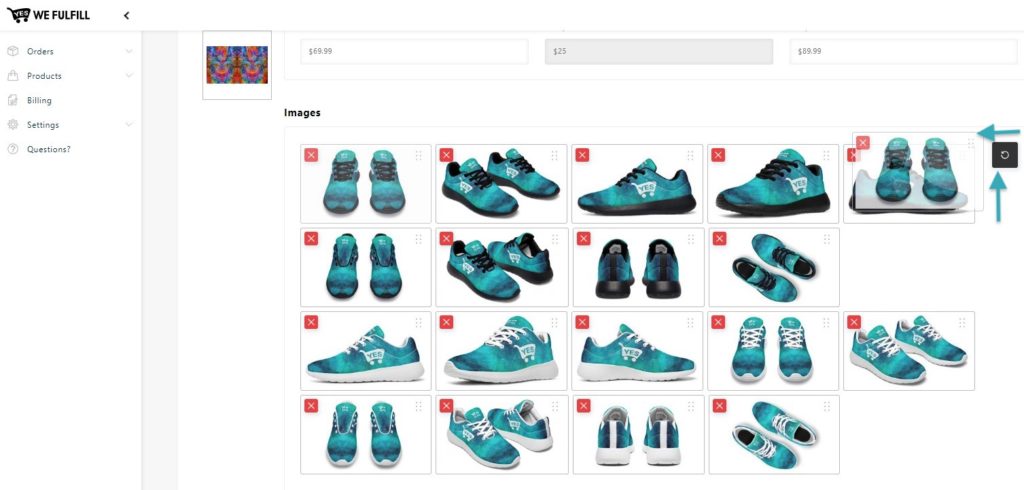
Click on the Product Details button to access all the editable fields such as Product Tags, Description, Pricing, Variant Images, etc
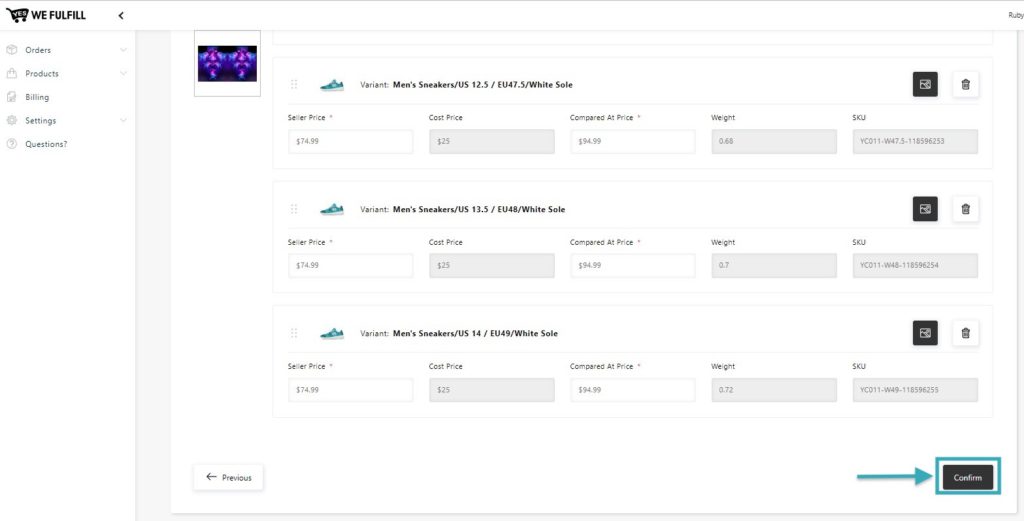
You can edit all fields that are not grayed, change the positions of the images, delete the ones you don’t want to display on your store, update the variants images as well as reorder the variants.
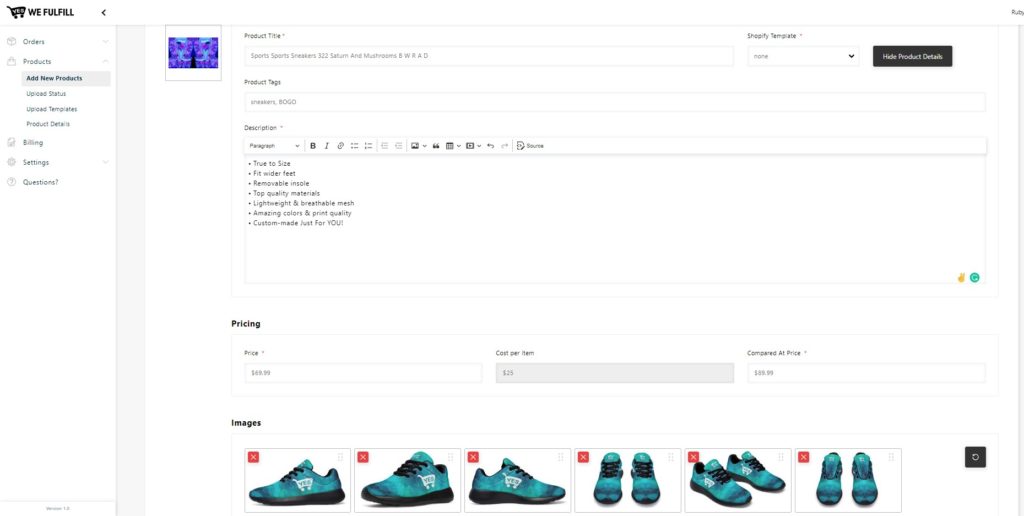
To change an image’s position, click on the little dots at the right of the image and drag the image to the desired position.
If you wish to reset your changes to the default position, click on the circle back arrow icon.
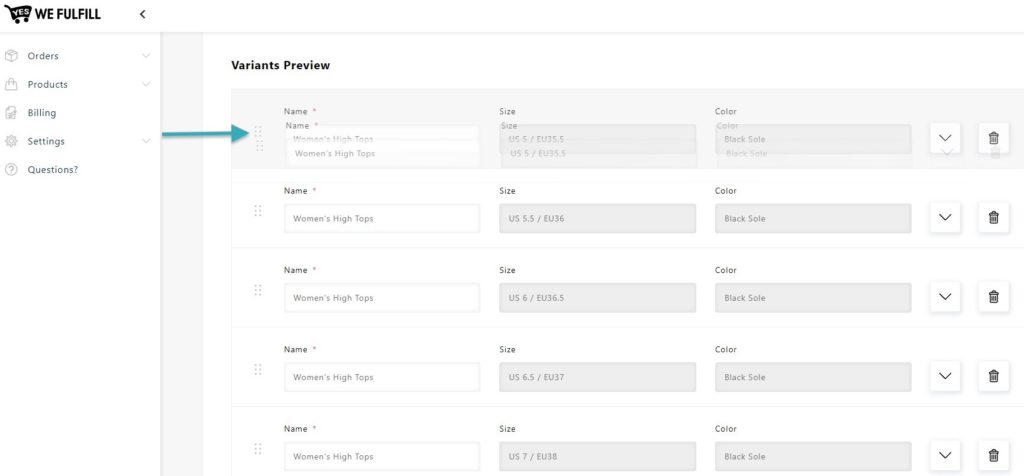
To change the variant’s positions, click on the little dots beside the variant image and drag the box up or down to the desired position.
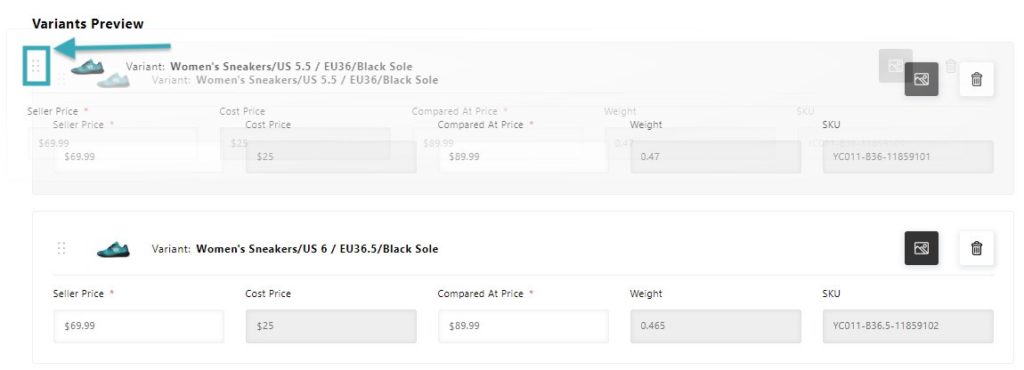
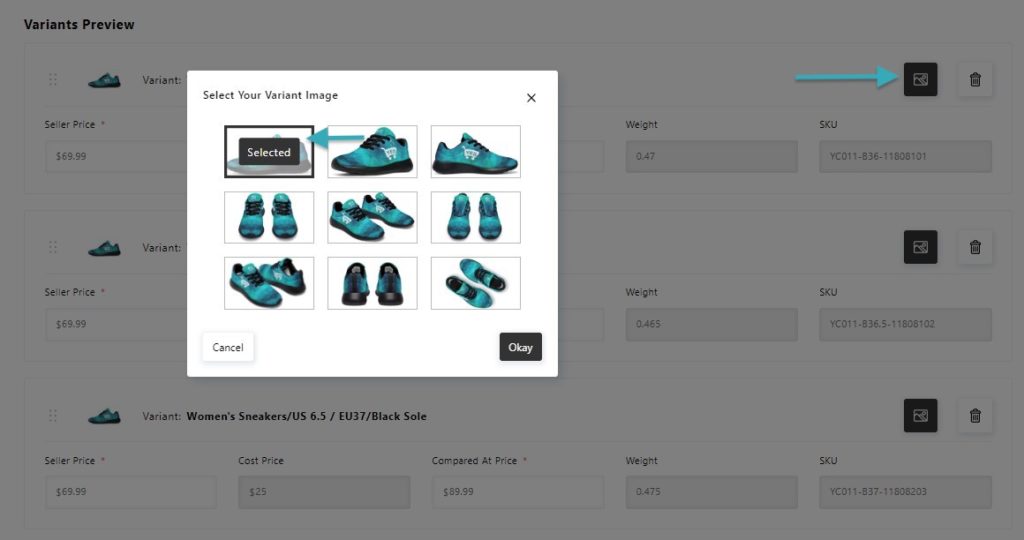
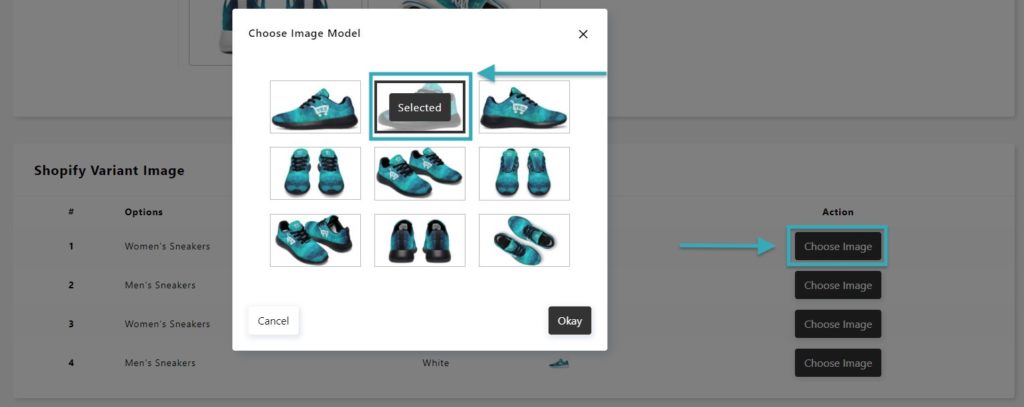
To change a variant image, click the landscape icon, drag your pointer on the desired image, click Selected, and then the Okay button.
Once all your changes are made, scroll down and click on the Confirm button.
Upload Your Designs – Step 3
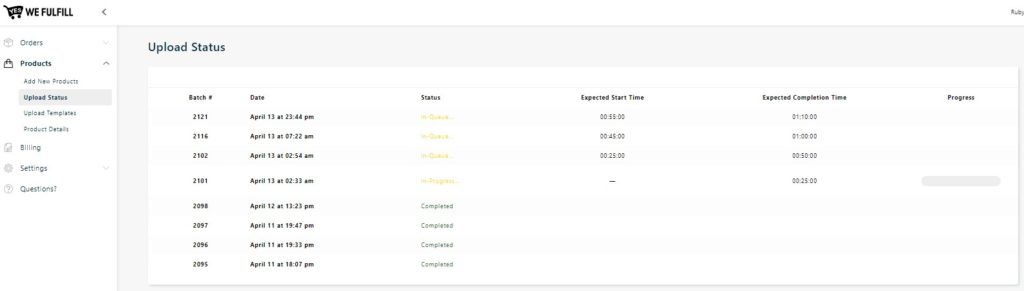
Once you’ve confirmed all the Product Details, you will be redirected to the Upload Status menu where you will see the status of your upload.
Batch #: Reference number attributed to each of your uploads.
Date: Month, day, and time
Upload Status
- In Queue: Your products are waiting to be processed.
- In Progress: Your products are being processed and mockups are being created
- Completed: Your products have been created in your store and are available to sell
Expected Start Time: The estimated time before your upload should start to be processed.
Expected Completion Time: The estimated time for your upload to be completed.
Progress: A progress bar will show once the status changes to In Process
View Product Uploaded
Once your upload is in In Progress status, you can click on the date to view all products associated with that batch upload and see their respective status.
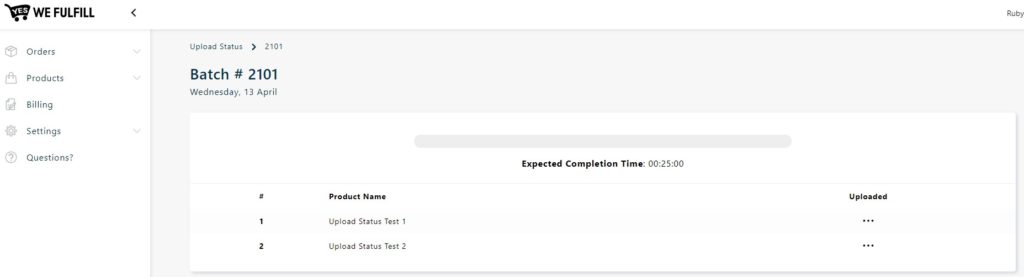
Once there is a Green check under the Uploaded field, this means your product has been created in your store.

Errors while uploading designs
- Incorrect dimensions: If your design dimensions are not matching the requirements, an error message will show at the top right corner of the page advising you what the requirements are for the specific product type.
- Maximum quantity of designs reached: If you try to upload more than 50 designs, an error message will be displayed on the page to advise you.
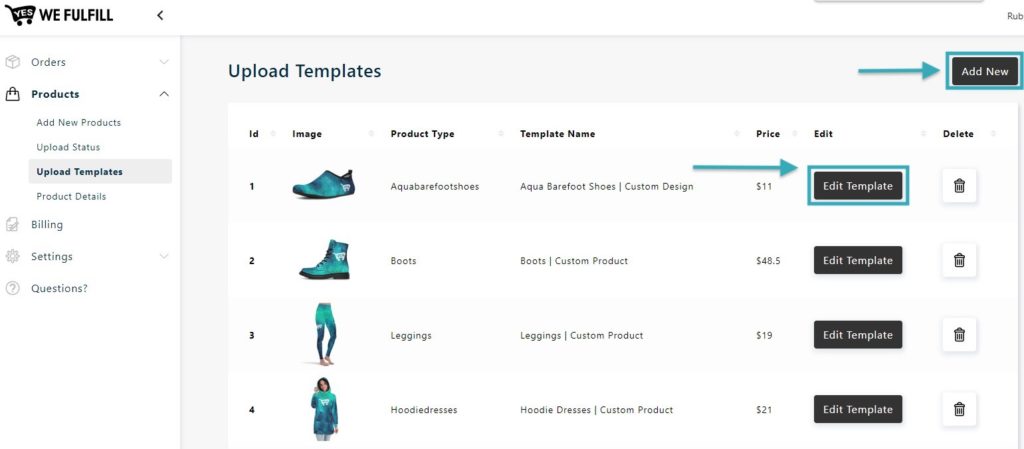
Upload Templates
To add a new template, click the Add New button at the top right corner of the page.
To edit a template, click the Edit Template button beside the respective template.
Then, select the Product Category, the Product Name and add any specific information in the Template Name to easily identify the change you made to your template.
Text added in the Template Name section will be added after the Product Name.
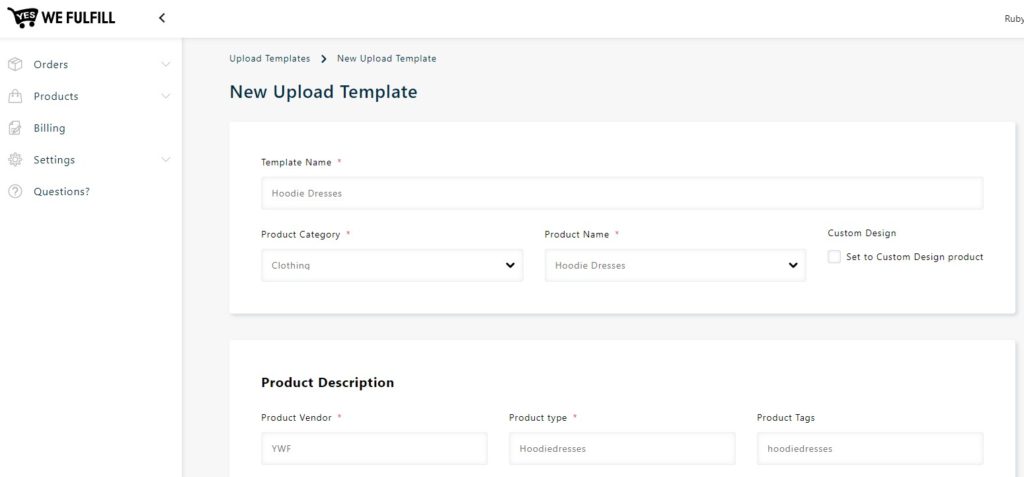
All fields are filled with default information we’ve set up in the App, but you can edit any field that is not grayed.
Fields with a red asterisk are mandatory.
Check the Set to Custom Design Product box if you wish to create a custom design template. Products uploaded as Custom Design will be imported in the Custom Design status when they are purchased by your customers and you’ll need to upload your customer’s custom designs to have them processed in production.
For more information about Custom Design products and orders, please read the Custom Design article.
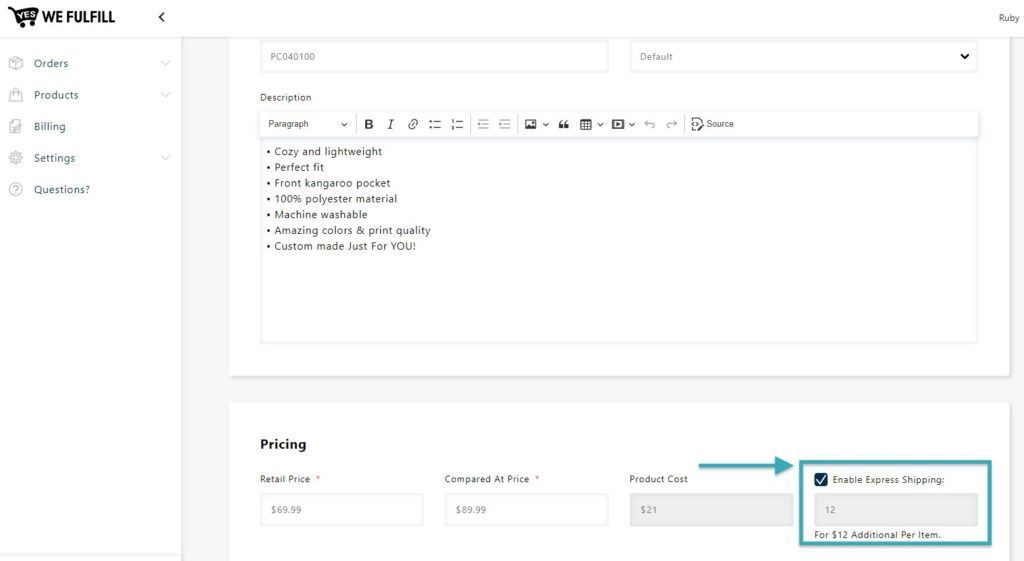
In the Pricing section, if you click the Enable Express Shipping box, all products uploaded using the template will be shipped using the Express Shipping Method (unless for some reason the method is not available in the customer’s shipping country).
Additional charges by item will be applied to your invoice.
Add/Edit Product Template
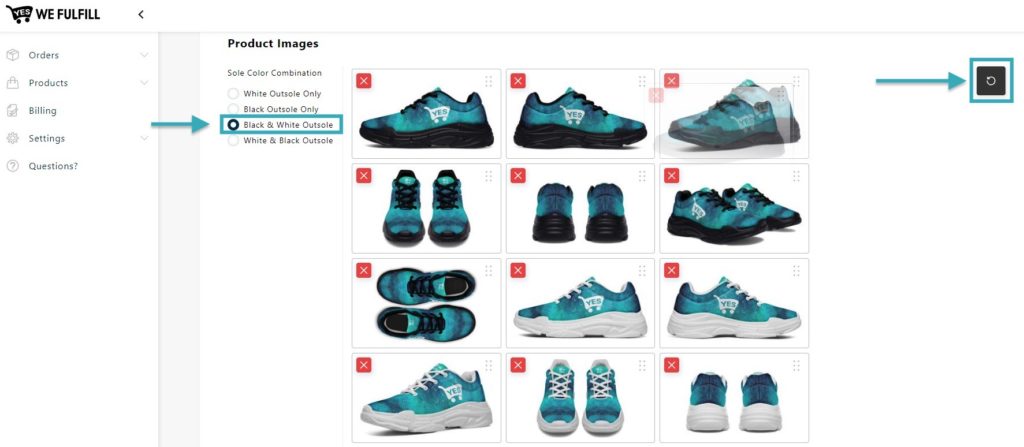
Under the Product Images section, you can delete images, reorder them or choose to use only Black or White Outsoles and even reorder the outsole color that is shown first.
To change the Product Images positions, select the little dots at the right of an image and move them to the desired place.
Check one of the Sole Color Combinations to quickly update the Product Images selection.
If you wish to reset your changes to the default position, click the circle back arrow icon.
To update the Shopify Variant image, click the Choose Image button and then select the desired image.
To change the variant’s positions, click on the little dots beside the variant image and drag the box up or down to the desired position.
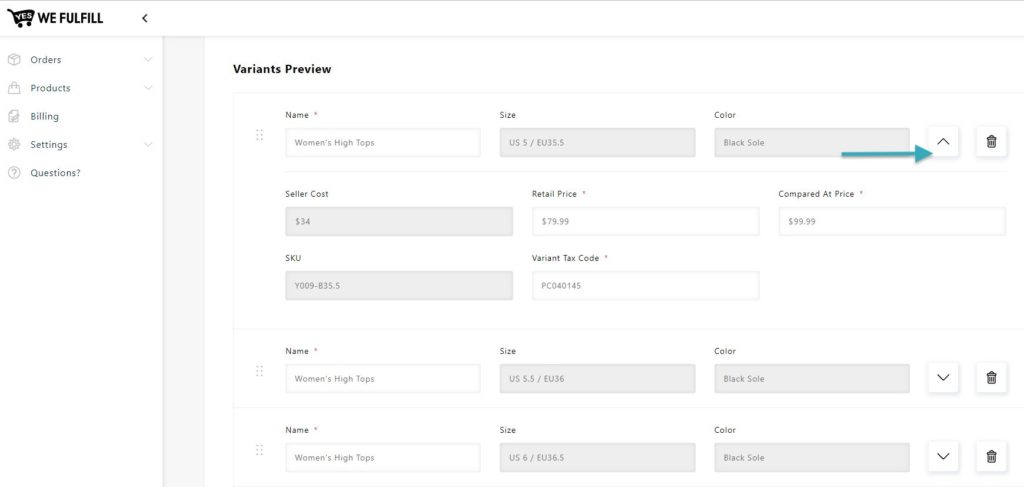
Click the arrow icon to edit the Retail Price, Compared At Price or Variant Tax Code of each variant if needed.
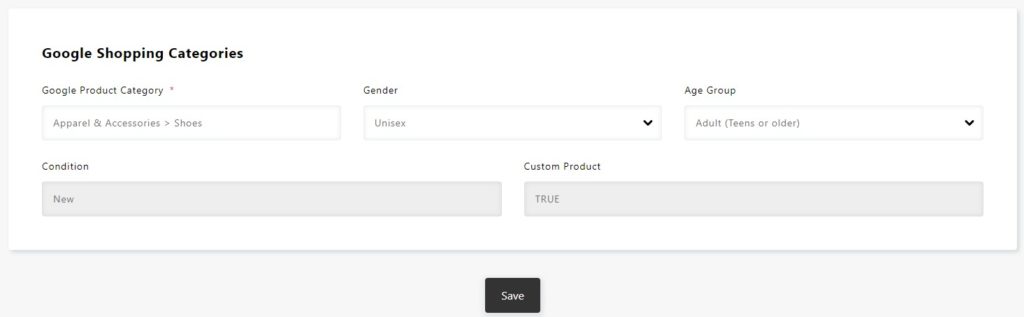
Lastly, you can also change the Google Shopping Category information if needed and click the Save button once all your changes have been completed.
Product Detail List
In this section, you will be able to see and download information specific to each product available in the YWF App such as their design requirements, size charts, prices, etc.
You can reduce the number of products available on the page by searching a word in the search bar or by selecting a category in the dropdown menu at the right of the page.
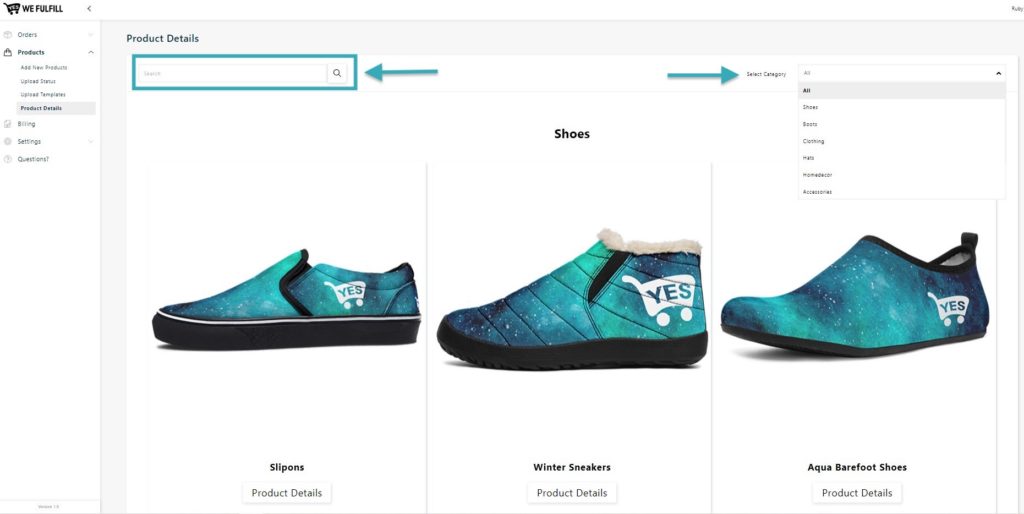
When you click on the Product Details button of a product you will access all of its information.
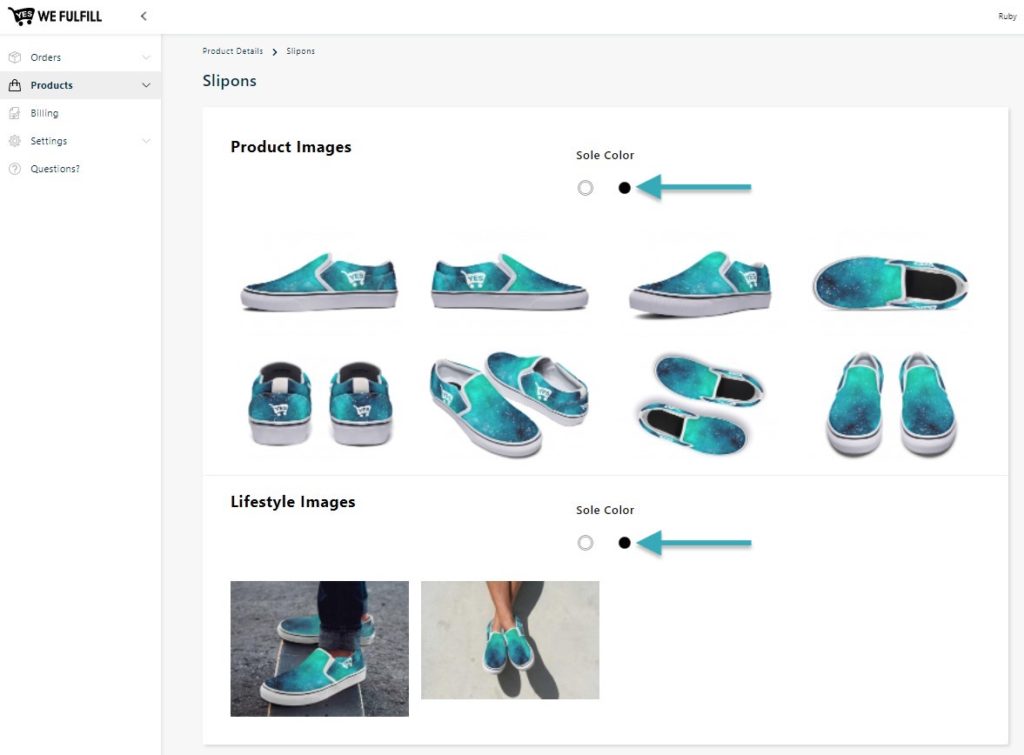
Product & Lifestyle Images
First, the Product Images and Lifestyle Images if available. You will see a white and/or black dot below the Sole Color and images will change as you select one dot or the other.
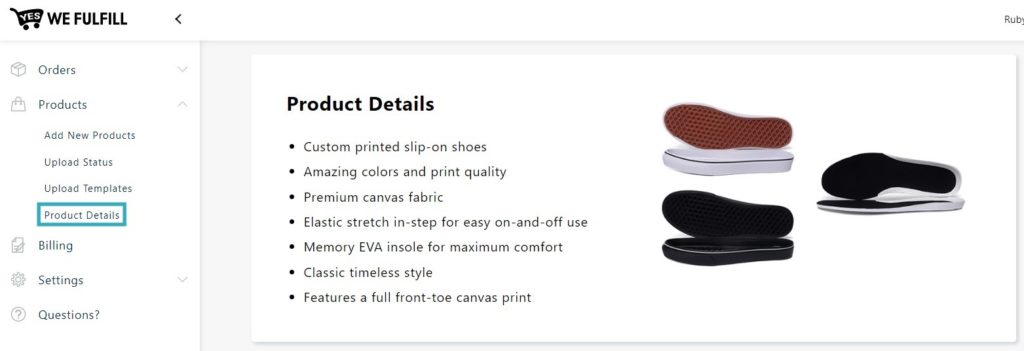
Product Details
The default description we’ve set up in the App will be available under the Product Details section along with the different outsole image views.
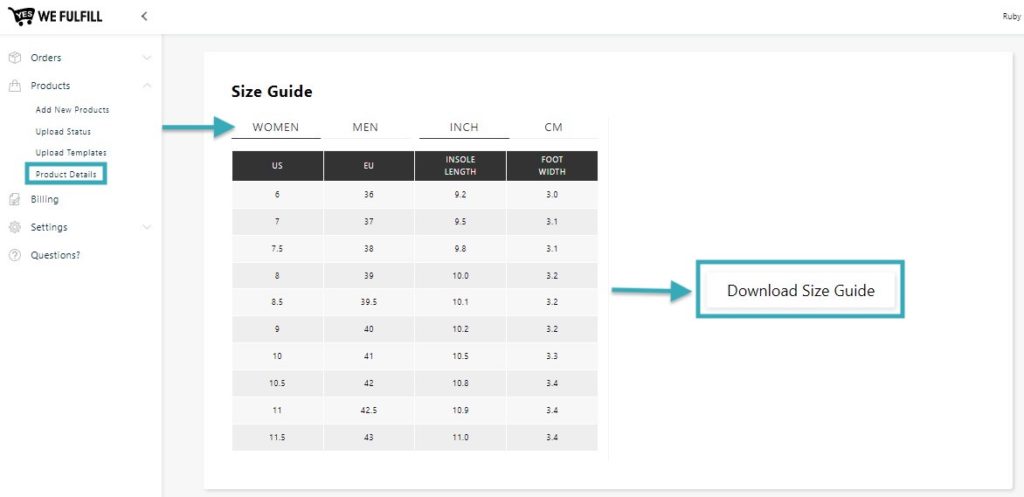
Size Guide
To preview the different size guides available, select the title Women, Men, Inch, or Cm.
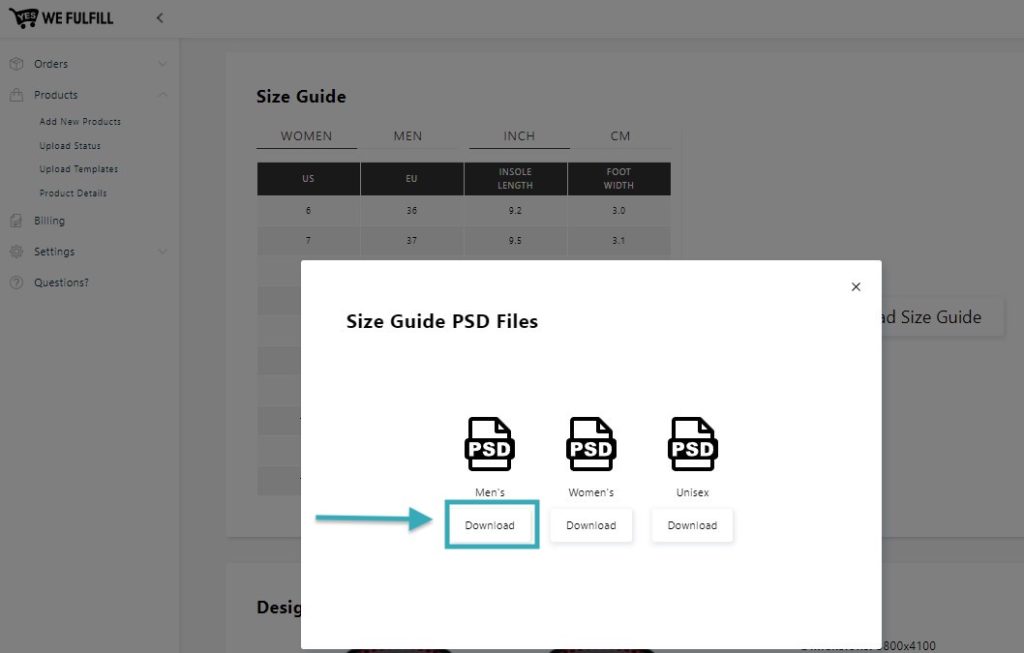
If you wish to download the Size Guide in PSD format, click the Download Size Guide button.
For all footwear products, three different PSD files Size Guide will be available: Men’s Women’s, and Unisex.
Design Template & Requirements
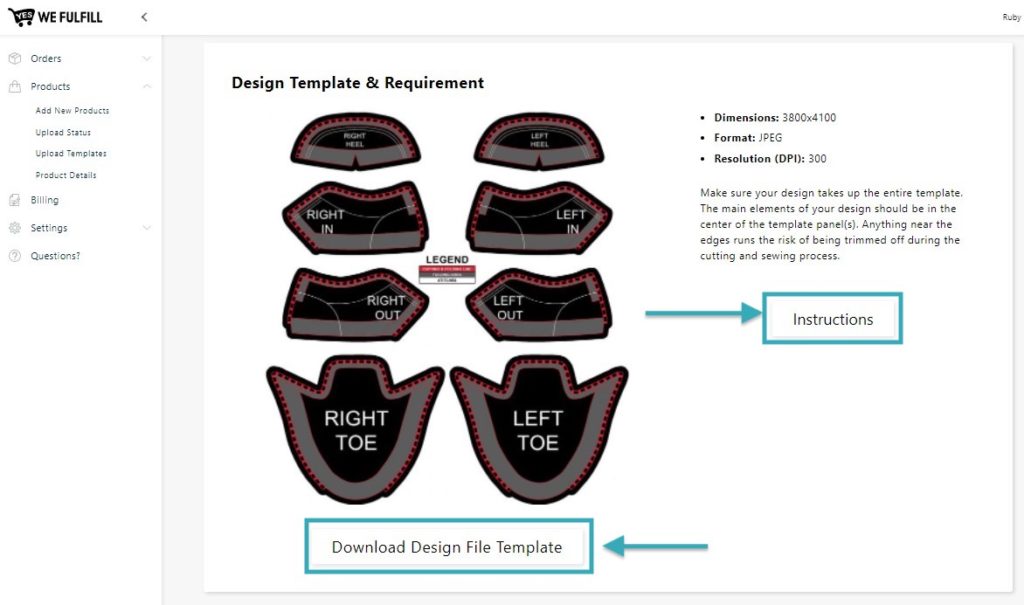
A preview of the design file template and its requirements is available in this section.
Click the Download Design File Template to obtain the PSD version.
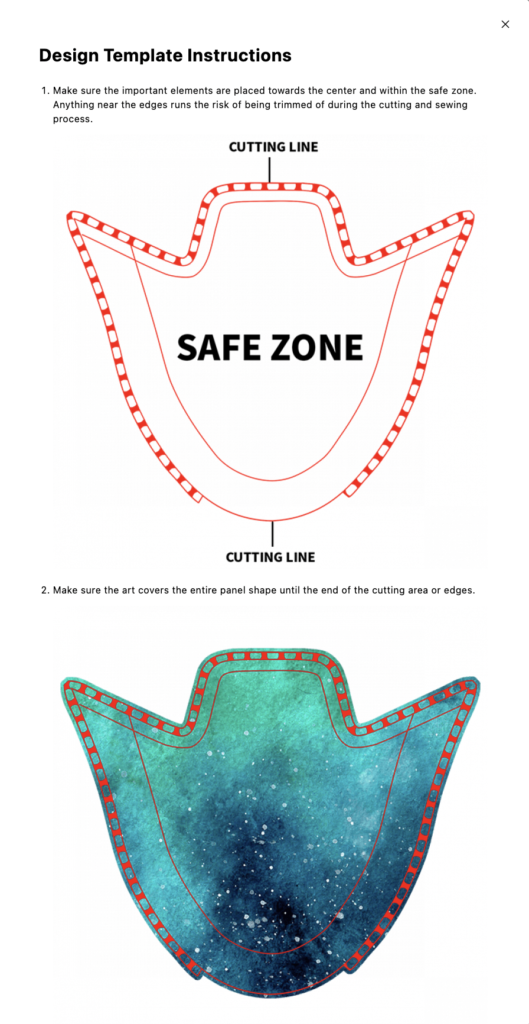
To get additional information on the design template file requirements, click the Instructions button.
Design File Template
Pricing and Shipping Info
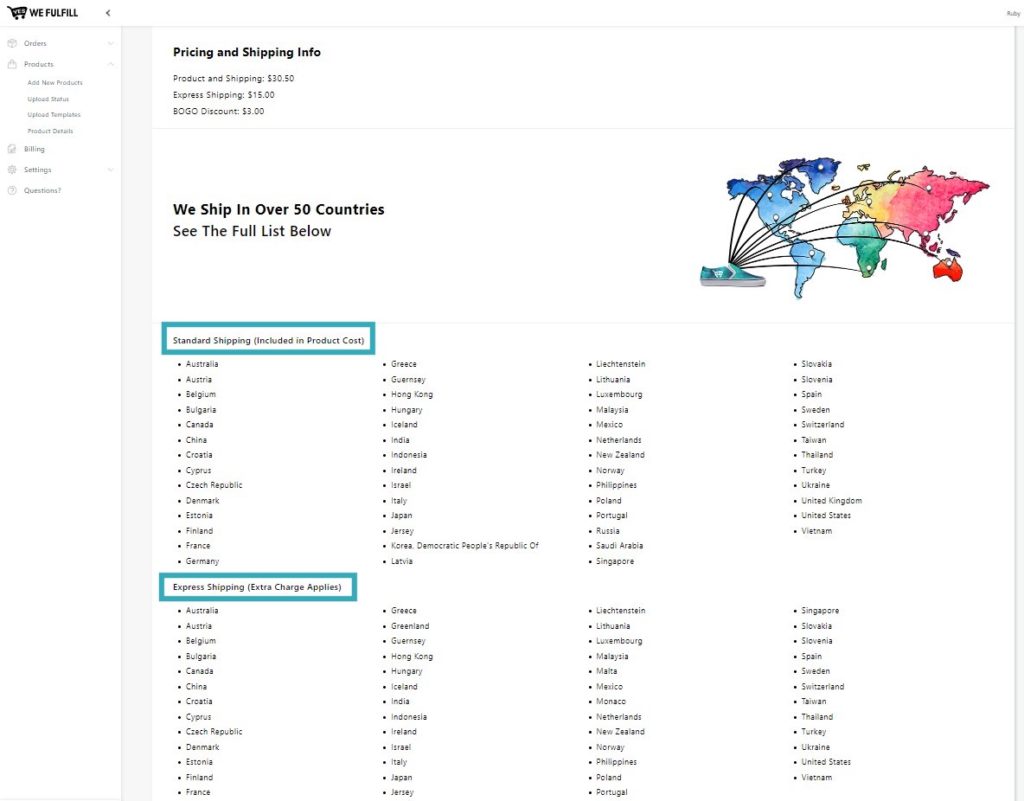
Prices:
- Product and Shipping: All our product prices include the Standard Shipping Method price
- Express Shipping: Extra charges if your product is shipped using the Express Shipping Method.
- Bogo Discount: Discount if 2 or more products are purchased in the same order. The smallest discount will be applied to your invoice. This means if product A has a Bogo Discount of $2.00 and product B has a Bogo Discount of $1.00, the Bogo Discount of $1.00 will be applied on your invoice.
The countries we can ship using the Standard Shipping method or the Express Shipping method are listed below each method.
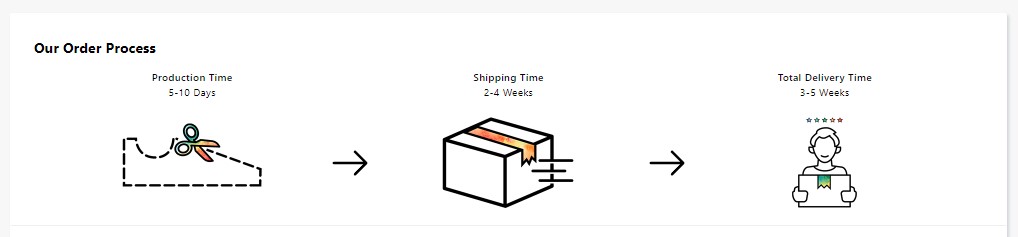
Our Order Process
Estimated Production Time, Shipping Time (Standard Shipping Method) and Total Delivery Time are available for each product.
In most cases, the average Shipping Time using the Express Shipping Method is 3-8 days depending on the destination country.
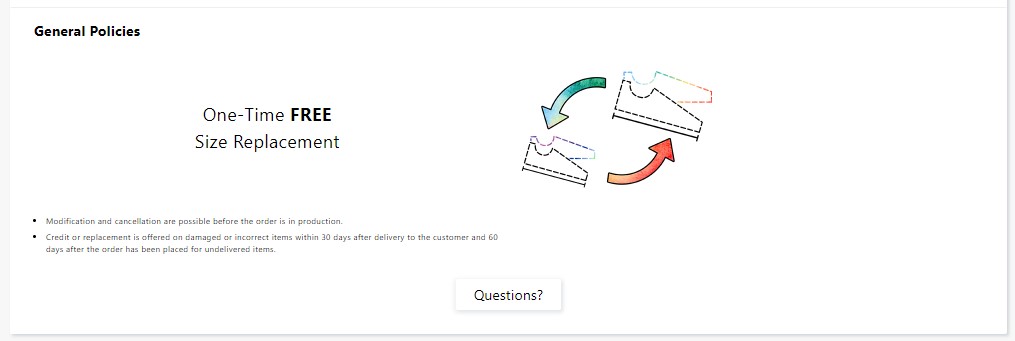
General Policies
We offer a one-time free size replacement on all our products to ensure your customers’ satisfaction. Certain conditions may apply.
Click the Questions? button to learn more about our different policies and processes.
Still Stuck? How can we help?